React-Native - Fastlane with Jenkins and AWS S3 on Mac Mini.
If you are here then you are most likely tired of releasing manual beta/prod builds for testing or Adhoc releases from your local machine and you are trying to setup a CI/CD pipeline for your Mobile project at the lowest cost instead of moving to cloud solutions. This is my take on the pipeline implementation.
Goals I wanted to achieve:
- Avoid releasing builds from local machines.
- Have a build history along with release notes.
- Reduce manual efforts.
- Ease of use or quality of life improvements for my developers and testers.
Tools used:
- Xcode (Thank you Apple)
- Fastlane (to automate the build through CLI)
- AWS S3, Lamda, Dynamo DB (to store artifacts and metadata)
- Mac Mini (agent node for Jenkins)
- Jenkins
- Github (Source control)
Prior to this the routine the developer used to follow was something like this to release builds.

This used to work when the team was just responsible for 1 App. As the team grew and we started developing more apps for various business functions this was identified as a bottleneck and we had to do something to fix it. We had identified a couple of approaches to fix this and here they are:
A. Use a cloud-based CI/CD like https://buddybuild.com/ or https://circleci.com/ or https://appcenter.ms/ — Where’s the fun in using ready-made tools.
B. Implement a custom solution and utilizing Jenkins which is widely used in the company and is managed pretty well.
We chose option ‘B’ and the interesting stuff begins.

The idea is that the job in Jenkins is triggered by a GitHub webhook or manually and the job builds the artifacts and uploads to S3 and using Lamda and DynamoDB a static page is updated with the latest build details. Here are the details on each of the stages of the process.
Webhooks
I would not go into Webhooks but here is a great article that explains how to configure them for Github and Jenkins https://www.blazemeter.com/blog/how-to-integrate-your-github-repository-to-your-jenkins-project
Jenkins with Mac Mini Agents
Mac Mini — We use 3 Mac Mini’s (2 of them are Intel i7’s with 256GB RAM and the other is an M1). We are planning to get more M1’s and replace the old Mac Minis. M1’s are pretty affordable and we use the 8GB versions with a cost of around $699.00 USD.
Things to install on Mac Mini:
- Xcode — At the time of write we run 12.5 and planning to move to 13
- Node — LTS v14.7.6 — Installed using pkg/dmg and not nvm.
- Ruby for Fastlane v3.x
- Fastlane — Latest
- Certs and private keys are needed by Fastlane to build and sign. (This step could be improved but decided to keep the certs on the System key chain of the agent nodes)
One thing that helped us was that we built one Mac Mini and cloned it using Time Machine to get the exact copies of the environment.
To add the Mac Mini as an Agent in Jenkins refer to this article by @caseyg1204 https://medium.com/@caseyg1204/setup-a-mac-slave-for-jenkins-63f087c8e943
Fastlane and Fastfile setup
Fastlane is a great tool to optimize the mundane tasks that a mobile developer has to go through as a part of daily life.
iOS — Fastfile, Appfile, Gemfile and Pluginfile
##Pluginfile
# Autogenerated by fastlane
#
# Ensure this file is checked in to source control!

gem 'fastlane-plugin-aws_s3'##Gemfile
source "https://rubygems.org"
gem "fastlane"
plugins_path = File.join(File.dirname(__FILE__), 'fastlane', 'Pluginfile')
eval_gemfile(plugins_path) if File.exist?(plugins_path)##Appfile
app_identifier("*********") # The bundle identifier of your app
itc_team_id("*******") # App Store Connect Team ID
team_id("*******") # Developer Portal Team ID##FastFilelane :alpha
    clear_derived_data()
    api_key = app_store_connect_api_key(
      key_id: "*********",
      issuer_id: "**********",
      key_filepath: "************",
      duration: 500,
      in_house: false
    )
    get_certificates( # Create or get certificate, and install it
        api_key:api_key,
        output_path: "./builds" # Download certificate in the build folder (you don't need to create the folder)
    )
    get_provisioning_profile( # Create or get provisioning profile
        api_key:api_key,
        development: true,
        output_path: "./builds",  # Download provisioning profile in the build folder
        filename: "provisioning.mobileprovision" # Rename the local provisioning profile
    )
    update_project_provisioning( # Set the project provisioning profile (related in Xcode to the General > Signing Release section)
        xcodeproj: "*********",
        target_filter: "*******", # Name of your project
        profile: "./builds/provisioning.mobileprovision",
        build_configuration: "Release"
    )
    update_project_team( # Set the right team on your project
        teamid: CredentialsManager::AppfileConfig.try_fetch_value(:team_id)
    )
    build_app(
        workspace: "***********",
        scheme: "********",
        clean: true,
        export_method: "development",
        export_options: {
            provisioningProfiles: {
                CredentialsManager::AppfileConfig.try_fetch_value(:app_identifier) => CredentialsManager::AppfileConfig.try_fetch_value(:app_identifier) + " AppStore" # Value of this parameter is the name of the Provisioning Profile. By default, it will be "{bundleId} AppStore"
            }
        },
        build_path: "./builds",
        output_directory: "./builds"
    )
enddesc "Upload to S3 bucket"
lane :aws_s3_upload do
    make_changelog_from_jenkins(
      fallback_changelog: "Not Determined or built locally"
    )
    aws_s3(
      access_key: ENV["ACCESS_KEY"],
      secret_access_key: ENV["SECRET_ACCESS_KEY"],
      bucket: ENV["BUCKET"],
      region: ENV["REGION"],
      ipa: ENV["APK_OR_IPA_PATH"],
      dsym: ENV["DSYM_PATH"],
      app_directory: ENV["APP_DIRECTORY"],                # Used to create the folder and is the primary id for dynamodb.
      upload_metadata: true,                          # Upload version.json, plist and HTML. Set to false to skip uploading of these files.
      version_file_name: 'app_version.json',          # Name of the file to upload to S3. Defaults to 'version.json'
      release_notes:  lane_context[SharedValues::FL_CHANGELOG]
    )
 end
Android — Fastfile, Appfile, Pluginfile & Gemfile
##Pluginfile
# Autogenerated by fastlane
#
# Ensure this file is checked in to source control!

gem 'fastlane-plugin-aws_s3'##Gemfile
source "https://rubygems.org"
gem "fastlane"
plugins_path = File.join(File.dirname(__FILE__), 'fastlane', 'Pluginfile')
eval_gemfile(plugins_path) if File.exist?(plugins_path)##Appfile
json_key_file("") # Path to the json secret file - Follow https://docs.fastlane.tools/actions/supply/#setup to get one
package_name("**********") # e.g. com.krausefx.app##FastFiledesc "Create a Alpha build - for QA, Testing, Internal Tech user"
desc "fastlane alpha"
lane :alpha do
  track = options[:track]
  gradle(task: "clean assembleRelease")

  # sh "your_script.sh"
  # You can also use other beta testing services here
end

desc "Upload to S3 bucket"
lane :aws_s3_upload do
  make_changelog_from_jenkins(
      fallback_changelog: "Not Determined or built locally"
  )
  aws_s3(
      access_key: ENV["ACCESS_KEY"],
      secret_access_key: ENV["SECRET_ACCESS_KEY"],
      bucket: ENV["BUCKET"],
      region: ENV["REGION"],
      apk: ENV["APK_OR_IPA_PATH"],
      app_directory: ENV["APP_DIRECTORY"],                # Used to create the folder and is the primary id for dynamodb.
      upload_metadata: true,                          # Upload version.json, plist and HTML. Set to false to skip uploading of these files.
      version_file_name: 'app_version.json',          # Name of the file to upload to S3. Defaults to 'version.json'
      release_notes:  lane_context[SharedValues::FL_CHANGELOG]
  )
end
Could be triggered by “bundle exec fastlane alpha”. I recommend running “bundle update” which installs the gems and the plugins required based on the Gemfile before executing the build process.
S3 Bucket
We went with a simple bucket where the objects can be public for ease of use. We might be using pre-signed URLs if needed in the future.
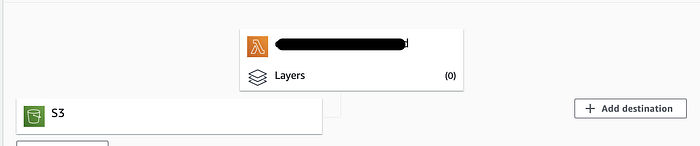
AWS Lamda
We created 2 Lamdas each with a specific purpose and triggered by different ways.
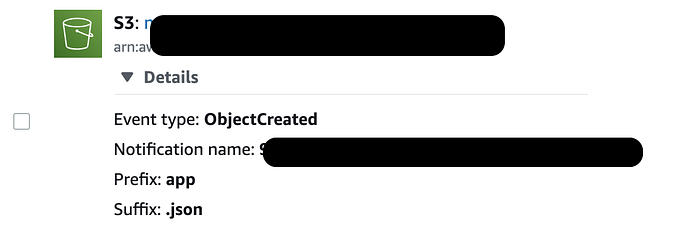
- Triggered on S3 upload where we configured based on prefix “app” and suffix “json”. The JSON that's uploaded by fastlane looks like this which is parsed and inserted in DynamoDB for fetching from the HTML page.
{
    "latestVersion": "6.0.330",
    "updateUrl": "itms-services://?action=download-manifest&url=**********",
    "plist_url": "******",
    "ipa_url": "*****",
    "build_number": "330",
    "bundle_version": "6.0",
    "release_notes": "build: fixed the apk name for universal builds\ntest: fixed the test case to consider local timezone\nbuild: fixed the apk name for universal builds\nfix: missing styles in common-styles\nbuild: fixed the apk name for universal builds\n"
}
Lambda NodeJS code
const AWS = require('aws-sdk')
const dynamo = new AWS.DynamoDB.DocumentClient()
const s3 = new AWS.S3()exports.handler = async (event) => {
  const BUCKET_NAME = "********"
  const srcBucket = event.Records[0].s3.bucket.name
  if (srcBucket === BUCKET_NAME) {const srcKey = decodeURIComponent(event.Records[0].s3.object.key.replace(/\+/g, " "))
    const typeMatch = srcKey.match(/\.([^.]*)$/)
    if (!typeMatch) {
      console.log("Could not determine the type.")
      return
    }
    const fileType = typeMatch[1].toLowerCase()
    if (fileType === "json") {
      try {
        const params = {
          Bucket: srcBucket,
          Key: srcKey
        }
        var data = await s3.getObject(params).promise()
        var versionFileData = JSON.parse(data.Body)
        var appName = srcKey.split("/")[0]
        const item = {
          appId: appName,
          buildNumber: versionFileData.build_number || versionFileData.version_code,
          buildVersion: versionFileData.bundle_version ||  versionFileData.version_name,
          ipaUrl: versionFileData.ipa_url,
          latestVersion: versionFileData.latestVersion,
          releaseNotes: versionFileData.release_notes,
          updateUrl: versionFileData.updateUrl,
          plistUrl: versionFileData.plist_url,
          htmlUrl: `https://${srcBucket}.s3.amazonaws.com/${appName}/index.html`
        }
        await dynamo
          .put({
            TableName: "********",
            Item: item
          })
          .promise()
      } catch (error) {
        console.log(error)
        return
      }} else {
      console.log(`Unsupported version type type: ${fileType}`)
      return
    }const response = {
      statusCode: 200,
      body: JSON.stringify('App uploaded/registered!'),
    }
    return response
  }
  const response = {
    statusCode: 400,
    body: JSON.stringify('Bucket name invalid ', srcBucket),
  }
  return response
}
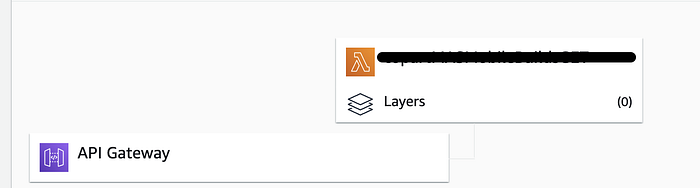
2. Lamda to Fetch data from Dynamo DB and exposed using AWS API Gateway
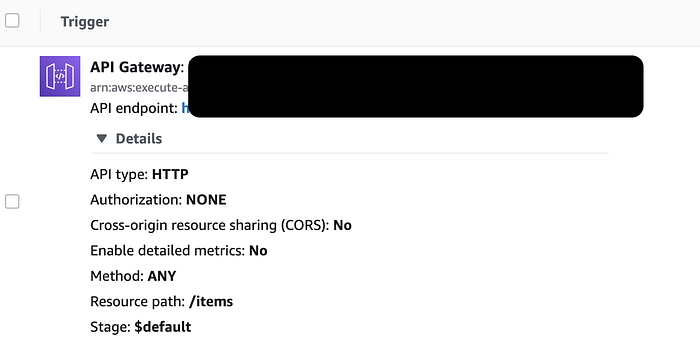
const AWS = require("aws-sdk");const dynamo = new AWS.DynamoDB.DocumentClient();exports.handler = async (event, context) => {
  let body;
  let statusCode = 200;
  const headers = {
    "Content-Type": "application/json",
    'Access-Control-Allow-Origin': '*',
    'Access-Control-Allow-Credentials': true,
  };try {
    switch (event.routeKey) {
      case "GET /items":
        body = await dynamo.scan({ TableName: "*********" }).promise();
        break;
      default:
        throw new Error(`Unsupported route: "${event.routeKey}"`);
    }
  } catch (err) {
    statusCode = 400;
    body = err.message;
  } finally {
    body = JSON.stringify(body);
  }return {
    statusCode,
    body,
    headers
  };
};
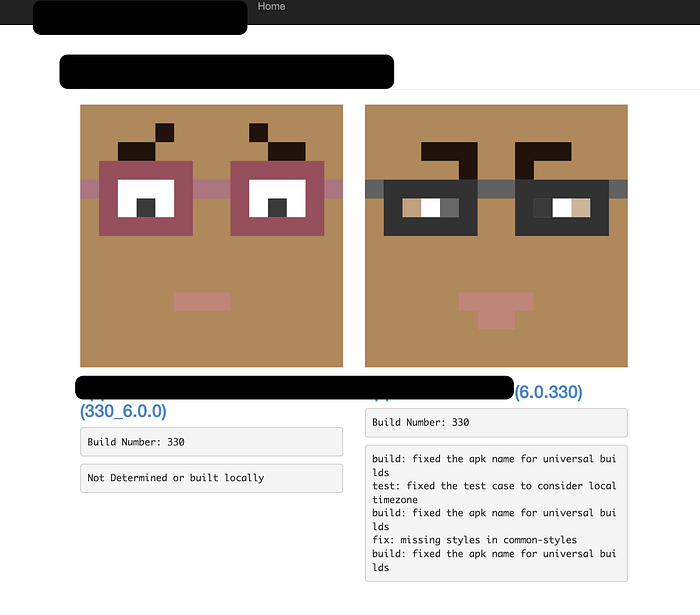
Finally created a static page and upload it on S3 which fetches the data from the API and renders the builds and information something like this. Not uploading the code as it is bare-bones HTML and Petite Vue :).


Conclusion:
I was able to automate this process in a day and is working out pretty well for us. There are some things that can be improved like adding test cases before upload which can be done in Jenkins or from npm run scripts in fastlane and notifying over slack or teams but I would leave it to your imagination. Hope this helps you in some way.